This one pumpkin gave me so much trouble. I could not get it to stay on it's stilt. I did all of the other pumpkins on a different shelf and then I went back to this one. I was so proud of myself for getting it to stay. Ha! The blue thing is a part of the fish 2.0 that I'm making for Craig.
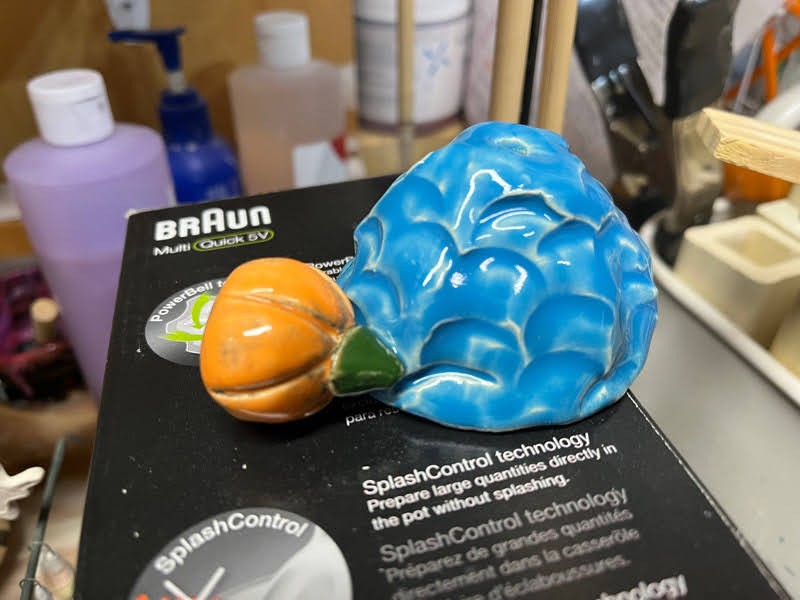

I brought it up to Craig to show him the "progress" and he immediately turned it into a dog hat. Who wears it better?
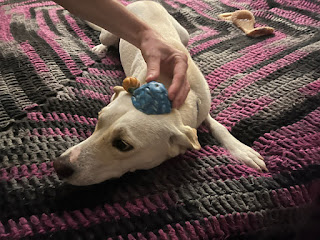
These things happen sometimes. I think the fish will work with one less body piece and I can always make another. I also think maybe I can market this dog hat thing ;)
This past weekend I was at the MacKenzie-Childs Artisan Craft Festival in Aurora NY. It was their first time holding this festival, but I hope that they decide to continue. There were great crowds both Friday and Saturday. Sunday was a little slower, but still had a good number of people.
This was my first show that was out of state and required staying at a place overnight. So what did I learn? First, MacKenzie-Childs puts on a really good show. Starting with the drop off which was really well organized with time slots. We got the booth "empty" setup on Thursday afternoon.

This is my setup from Friday. I am still loving the shelves that Craig built for me. It enables me to display the more artsy items separate from the more tactical items in my booth.

The shelves work really well. My one complaint of them is that he intentionally made it so that the biggest shelf was on the bottom. That means that I can't display some of my pieces like the lemon plates at eye level. I'm not sure it matters though as peopel did come in and interact with the shelves at just about every level.

On the right side of my booth is more tactical items like the mugs and some smaller plates. It has been interesting finding the balance between having enough variety out for people to see vs not making things too cluttered. I ended up setting up slightly differently each day. Also during the day I'd move things around. It's the first time I've really done that and I think it worked well.

I didn't realize how dark this picture came out with the light behind it. I should have taken it later in the day. I had a new jewelry setup for this show. I still didn't sell a lot of jewelry. I'm not sure if that's because I still don't have it displayed well or if people just think ceramic jewelry is too heave or people don't like my jewelry or if it's the display. Going to have to do more research on this one.
Speaking of research, I have a clipboard of what I have and then as I make sales I record what I've sold. You know when that's difficult to do- when there is a line of people waiting to buy stuff. I mean, it's great to have a line of people wanting to buy my stuff, but it was also stressful.

There was a gentleman in the next tent selling felt flowers. You could go into his booth and make your own bouquet. I always mean to have fresh flowers in my vases to show off what they are, but never have the time. Leaph Boutique was the perfect solution to this. Now I'll always have flowers, he even styled them for me.

Part of the expense of the weekend was because we rented a house so we could bring the dogs with us. It's just a really expensive area. Willow approved though.

The view from the house was also amazing.

All in all this was a great experience. I do hope that MacKenzie-Childs decides to make this an annual event. I don't know that I want to do other out of town events, but I would strongly consider doing this one again next year.
Originally I was going to try to get 2 kiln loads in over the weekend before the MacKenzie-Childs show happening this weekend September 30 - October 2 10am-5pm. I decided to pack for the show on Friday night and while packing decided - pushing myself to do 2 kiln loads wasn't necessary. However, there were a few things that I did want to get glazed to bring to the show.
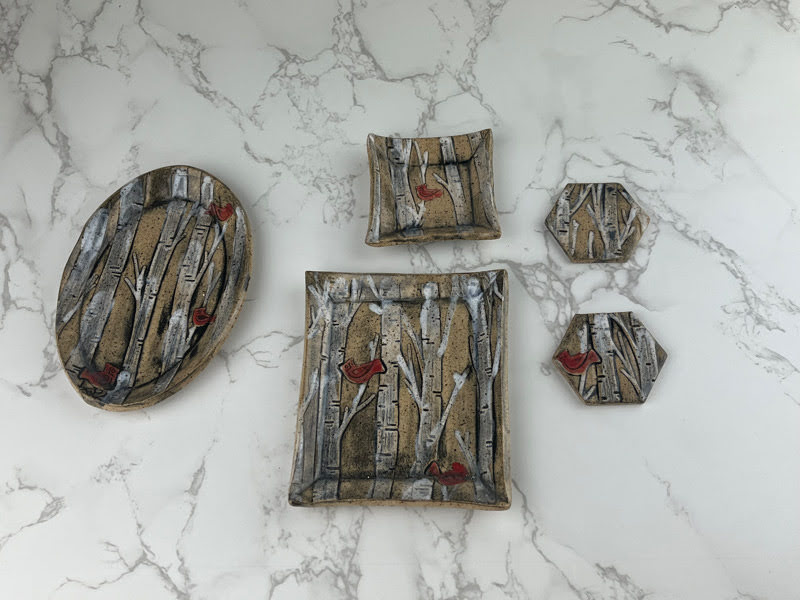
It's hard to pick favorites from this kiln because it's a lot of goodness, but the pumpkins and the birch vase definiely pull ahead to the front. I don't know why I don't make more extruded pots. I always love how they turn out, they're just so unique. I made a vase like the tree one in this kiln load recently on b-mix. I had also made several soap dishes on the Laguna 60 that I really liked with that pattern. I decided to combine the two and WOW.
The ghost jewelry came out better than I imagined in my head. They're just so cute. I made 3 of the bats to start. One didn't make it home from Chaumont. One didn't make it into the bisque. This is the last one and it's also so cute.
Last kiln opening before the MacKenzie-Childs Artisan Festival this weekend. There are a few things in here that I am super excited about and hoping that they came out ok (well I'm hoping for fantastic).
The pumpkin looks like it came out amazing. There is another larger one on the full shelf below it that I'm hoping looks as good. I'm also loving the pitcher on the left. I stressed about how to glaze it and I really love it.
The tree in the front is one of 3 of varying sizes. I have a set in my house that I love and I finally got around to making a second one. I have it sitting on my coffee table in the front room and it really just fits there.
I also have a replacement fish hanging for Craig. I made version 1.0 last year for him. We had to move it earlier this year because we took down the branch it was on to make room for the gazebo. The next trip up I found it on the ground and mostly smashed. I'm not sure if it was just too windy or if the twine would have given out any way, but time for version 2.0.

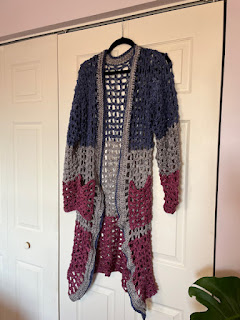
This yarn is so soft. It's made from silk, merino, and sea cell. What is sea cell you ask? Sea cell is a fiber that's made from seaweed! I got this yarn at the Maryland Sheep and Wool having never heard of sea cell. All I knew is that it was just so soft and silky. This particular yarn came from Yarn Hygge. Something about these colors cried out color block to me. I used 2 skeins each of Blues, Silver, and Burgandy. Each skein is approzimately 240 yards.

This pattern uses a 5mm hook.
Stitches:
sk - skip
ch - chain
sc - single crochet
scblo - single crochet back loop only
hdc - half double crochet
hdcblo - half double crochet back loop only
bobble - yarn over, pull loop up, yarn over, pull loop up, yarn over (7 loops on hook), pull all the way through
This sweater is made using the mesh stitch with a bobble which is addapted from a popcorn mesh stitch. Cast on in multiples of 6 + 2. For the back panel I cast on 56 (54 + 2).
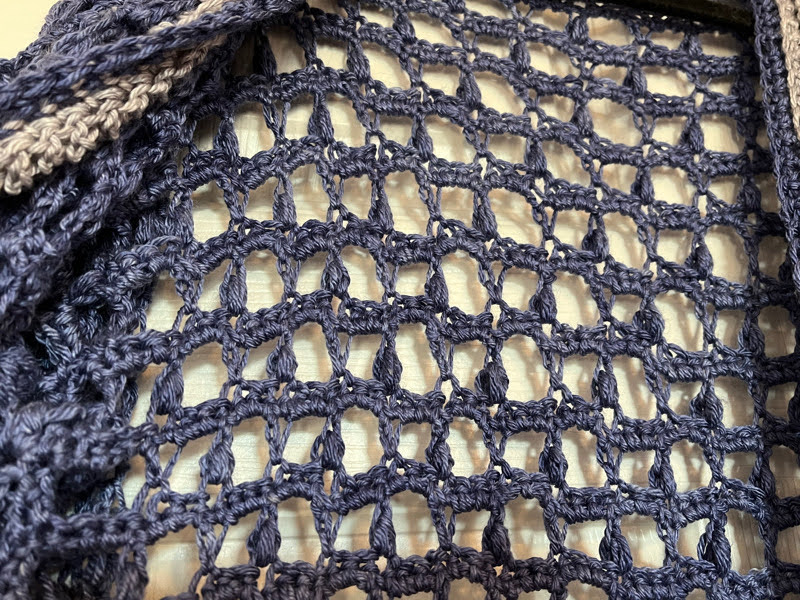
Row 1: Sc in the 2nd ch from the hook. * ch 3, sk 2 chains, bobble in next chain, ch 3, sk 2 chains, sc in the next ch. Repeat from * across.
Row 2: Ch 1, sc in the first sc, * 3 sc in the chain space, skip the bobble, 3 sc in the chain space, sc in the sc. Repeat from * across.
Row 3: Ch 2, dc in the same sc, * ch 3, sk next 3 sc, sc, ch 3, sk next 3**, bobble. Repeat from * across ending with the **, dc in last stitch.
Row 4: Ch 1, sc, *3 sc in the chain space, sc in the sc, 3 sc in the chain space, skip the bobble. Repeat from * across, sc in the last stitch.
Row 5: Ch 1, sc in first sc, * ch 3, sk 3 sc, bobble in next sc, ch 3, sk 3 sc, sc. Repeat from * across, sc in the last stitch.
You're going to repeat rows 2-5 until you reach your desired length. The big decision was how big to make the color blocks. I ended up deciding that each block should be 26 rows. Based on that....rows 1-26 are burgandy, rows 27-52 are silver, and rows 57-78 are blues. You could absolutely change this up to make the blocks, bigger smaller, or even stripes. What's important for this pattern to look right is that you change out on an odd row. The even rows make the row below it look finished.

For the side panels do the exact same pattern as you did for the back, but make them narrower. For my sweater I cast on 24. Make 2 side panels.
Next step is to sew the side panels to the back panel. I found that this was easier than on a lot of sweaters because all I had to do was line up the holes. The top of the side panel and the back panel are sewed together across. There will end up being 3 holes between the two side panels. For the arms I measured to get about 8 inches and found that each hole was about an inch so I left 8 holes open on either side. Finally, I left 2 holes open at the bottom - this is purely asthetic. Since this sweater is rather holey I decided when sewing up the sides that I wanted to use the color of the color block as I sewed and have a little overlap rather than pick 1 color to sew with. This made my seems much less noticeable.
Next step is to do the arms. We're going to repeat the same pattern as above except the last stitch for each will turn into a slip stitch. If you've been reading my patterns you know that I'm not super dilligent on you must pick up x number of stitches on the arm hole. Most of the time my sleeve patterns stitches are in 1s or 2s. For this pattern it matters more because we want to be able to have the nice bobble mesh. What's nice though is that you can line up with the holes. However, by this time you should be comfortable with the overall pattern so if you pick up in a multiple of 3 vs 6 - it's not a big deal. I picked up 9 "holes" for a total of 59 stitches.
For the sleeves I made the determination to make the color blocks smaller. I ended up deciding each block should be 14 rows so based on that...rows 1-14 are blues, rows 15-28 are silver, and rows 29-43 are burgandy (yes I know there's an extra row, I'll explain later).
I always start arms on tops in the arm pit so it hides the seams a bit.
Row 1: Sc in the 2nd ch from the hook. * ch 3, sk 2 chains, bobble in next chain, ch 3, sk 2 chains, sc in the next ch. Repeat from * across, slip stitch to join. Note: if you're in a multiple of 3 vs 6 then you'll join after the sc instead of the bobble.
Row 2: Ch 1, sc in the first sc, * 3 sc in the chain space, skip the bobble, 3 sc in the chain space, sc in the sc. Repeat from * across, slip stitch to join.
Row 3: Ch 2, dc in the same sc, * ch 3, sk next 3 sc, sc, ch 3, sk next 3**, bobble. Repeat from * across ending with the **, slip stitch to join. Note: if you're in a multiple of 3 vs 6 then you'll join after the bobble instead of the sc.
Row 4: Ch 1, sc, *3 sc in the chain space, sc in the sc, 3 sc in the chain space, skip the bobble. Repeat from * across, slip stitch to join.
Row 5: Ch 1, sc in first sc, * ch 3, sk 3 sc, bobble in next sc, ch 3, sk 3 sc, sc. Repeat from * across, slip stitch to join. Note: if you're in a multiple of 3 vs 6 then you'll join after the bobble instead of the sc.
Row 6: Repeat row 2.
Row 7: Repeat row 3.
Row 8: Repeat row 4.
Row 9: Repeat row 5.
Row 10: Repeat row 2.
Row 11: This is our first decrease. Repeat row 3 except don't do the last 2 chains. You'll join from your last bobble or sc (depending on if you started from 3 or 6) and slip stitch to the sc.
Row 12: Repeat row 4.
Row 13: Repeat row 5 except don't do the last 2 chains. You'll join from your last bobble or sc (depending on if you started from 3 or 6) and slip stitch to the sc.
Row 14: Repeat row 2.
Row 15: Change colors. Repeat row 3 except don't do the last 2 chains. You'll join from your last bobble or sc (depending on if you started from 3 or 6) and slip stitch to the sc.
Row 16: Repeat row 4.
Row 17: Repeat row 5 except don't do the last 2 chains. You'll join from your last bobble or sc (depending on if you started from 3 or 6) and slip stitch to the sc.
Row 18: Repeat row 2.
Row 19: Repeat row 3 except don't do the last 2 chains. You'll join from your last bobble or sc (depending on if you started from 3 or 6) and slip stitch to the sc.
Row 20: Repeat row 4.
Row 21: Repeat row 5.
Row 22: Repeat row 2.
Row 23: Repeat row 3.
Row 24: Repeat row 4.
Row 25: Repeat row 5.
Row 26: Repeat row 2.
Row 27: Repeat row 3 except don't do the last 2 chains. You'll join from your last bobble or sc (depending on if you started from 3 or 6) and slip stitch to the sc.
Row 28: Repeat row 4.
Row 29: Change colors. Repeat row 5 except don't do the last 2 chains. You'll join from your last bobble or sc (depending on if you started from 3 or 6) and slip stitch to the sc.
Row 30: Repeat row 2.
Row 31: Repeat row 3.
Row 32: Repeat row 4.
Row 33: Repeat row 5.
Row 34: Repeat row 2.
Row 35: Repeat row 3.
Row 36: Repeat row 4.
Row 37: Repeat row 5.
Row 38: Repeat row 2.
Row 39: Repeat row 3.
Row 40: Repeat row 4.
Row 41: Repeat row 5.
Row 42: Repeat row 2.
Row 43: Repeat row 3.
Row 44: ch 2, hdc in each stitch around, slip stitch to join.

Now let's work on the edging. Turn the sweater right side out, with it flat in front of you pick up the bottom right edge. Using the silver yarn chain 2. For each hole that you have in the lace you need 4 stitches. I did 1 in the "post" of the hole and then 3 in the in betweens. For this you're going to want to do the stitches into the stitches and not the chain space to make it look good as the edging. You're going to hdc up the right side, across the back and then down the left side.
Edging:
Row 1: ch 2, hdc all the way around ending on the bottom left corner
Row 2: ch 2, hdc blo all the way around
Row 3: ch 1, sc all the way around
Row 4: ch 1, sc blo all the way around
Row 5: Change colors to blues. ch 1, sc all the way around
Row 6: ch 1, sc blo all the way around

Last step now is the pockets. My original plan was to make them out of the silver since that's the panel they'll be on, but I ran out of silver. I actually really like the way it looks with the burgandy pickets, really makes them pop.
Cast on 17.
Row 1: Sc in the 2nd ch from the hook. * ch 3, sk 2 chains, bobble in next chain, ch 3, sk 2 chains, sc in the next ch. Repeat from * across.
Row 2: Ch 1, sc in the first sc, * 3 sc in the chain space, skip the bobble, 3 sc in the chain space, sc in the sc. Repeat from * across.
Row 3: Ch 2, dc in the same sc, * ch 3, sk next 3 sc, sc, ch 3, sk next 3**, bobble. Repeat from * across ending with the **, dc in last stitch.
Row 4: Ch 1, sc, *3 sc in the chain space, sc in the sc, 3 sc in the chain space, skip the bobble. Repeat from * across, sc in the last stitch.
Row 5: Ch 1, sc in first sc, * ch 3, sk 3 sc, bobble in next sc, ch 3, sk 3 sc, sc. Repeat from * across, sc in the last stitch.
Repeat row 2-5. End on row 16 (8 holes). Make 2 pockets.
I knew I didn't want the pockets to cross the color block. I ended up placing them 1 back from the edge and 2 up from the silver/burgandy color change. Sew them around.
